iPhone Says No SIM: Troubleshooting and Fixes
Experiencing a “No SIM” error on your iPhone can be perplexing and disruptive, especially when you need your device the most.
This guide delves into the roots of the “iPhone says no SIM” issue, offering a comprehensive set of troubleshooting techniques and preventive measures to ensure your device remains functional and connected.
Understanding the “No SIM” Message
What Does “No SIM” Mean?
The “No SIM” message appears when your iPhone cannot detect the SIM card, a critical component for cellular services. This section explains the message’s implications and its impact on your device’s functionality.
Causes of the “No SIM” Error
Several factors can trigger this error, from software glitches to physical SIM card issues. Understanding these causes is the first step toward resolving the problem. The main ones are listed below.
- When you do not insert the SIM card correctly.
- If your service provider has limited signals in your area,
- When you have not installed a SIM card on your phone.
Immediate Fixes
1. Restarting Your iPhone
A simple restart can sometimes resolve the issue by refreshing the device’s internal systems. Here is how you can do it.
- From the Home Screen of your device, go into settings.
- Now, hop onto general then tap on transfer or reset the device.
- From there, go into “reset” and then press “reset network setting”
- Tap in your passcode and wait for your iPhone to do the job.
2. Airplane Mode Toggle
Airplane mode is built into every mobile phone which cuts off your phone’s access to network signals. On top of this, airplane mode is an easy way to put off distractions when you are trying to focus on something. You can fix the no SIM issue by toggling the airplane mode on and then off. Here is how you can do it.
- Jump to your iPhone settings.
- Now look for “airplane mode.”
- Click on the toggle twice to turn it on and off.
3. Confirm service plan
When your SIM carrier is not activated – it can lead to a no sim signal on your device as your phone can not catch any signals due to the blockage. So, you can check your call carrier to verify. Here is how you can do it.
- Hop onto your iPhone settings.
- Once you’re in, go into general and then press about.
- Now look for “carrier lock”.
- If you see “no sim restrictions” next to the carrier lock – it means that your carrier is activated and vice versa.
Checking the SIM Card
1. How to Remove and Reinsert the SIM Card
Properly handling the SIM card is crucial. Although it seems like an easy task – sometimes people do not insert their SIM cards properly into their mobile phones which can cause SIM failure in iPhones. So, try to reinsert your SIM card to see if things work out.
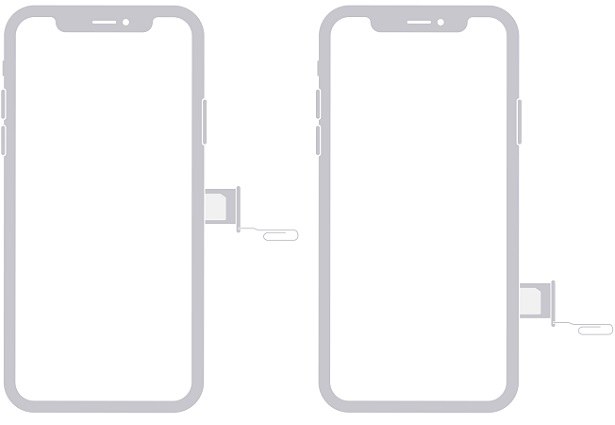
- You need a pin to get the job done. From the side of your phone, look for the sim tray.
- Now, insert the pin into the small hole and give it a little push.
- The sim tray will pop out, take the sim out, and put it back in correctly (see the back of the sim for instructions).
2. Try Another SIM Card
Sometimes, your network carrier may have some issues in your area. Therefore, you can try another SIM card on your phone to see if you can resolve the issue. Now, you can test out a spare SIM card on your phone. Or you can get a new SIM. When you have an alternative SIM card – just replace it with your current SIM card.
Software Solutions
1. Updating iOS
Apple, in pursuit of making things better for its consumers, releases tons of iOS updates. However, when people do not update their iPhones for a longer period, it can cause several lags. If you’re facing any issues, update your iPhone by following the steps listed below.
- Make sure that your data is backed up before you begin.
- Connect your phone to power and ensure that you have a stable wifi connection.
- Now, go to settings then general, and look for “software update”
- And then, click on “Install now”.
Note: The update can take some time, especially if your wifi is slow. So wait patiently, and do not unplug your device while the update is underway.
2. Resetting Network Settings
The network settings on your iPhone provide instructions for your device regarding your sim carrier. However, sometimes any mess-up in the settings can lead to several problems. But there is an easy way to fix them—just reset your network settings. Here is how you can do it.
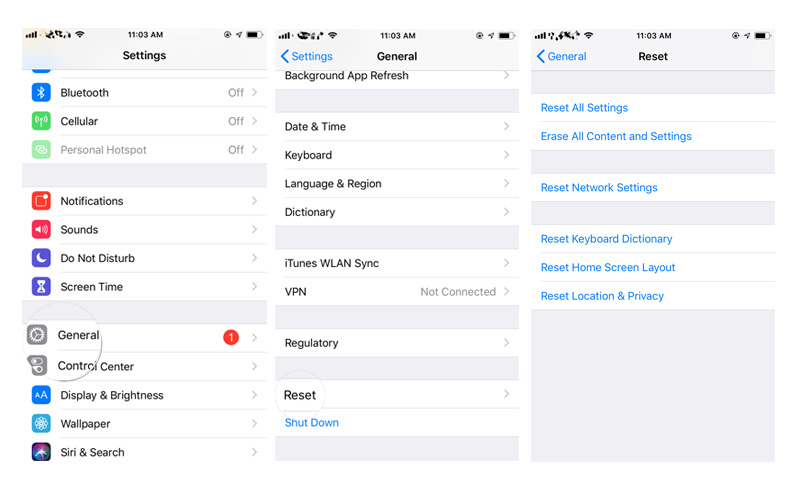
- From the Home screen of your device, go into settings.
- Now, hop onto general, then tap on transfer or reset the device.
- From there, go into “reset” and then press “reset network setting.”
- Tap in your passcode and wait for your iPhone to do the job.
Hardware Troubleshooting
1. Inspecting & cleaning the SIM Tray
A damaged or dirty SIM tray can cause detection issues.
Here’s how to inspect and clean your SIM tray effectively without damaging your phone or SIM card:
Before you begin:
- Power off your phone completely.
- Gather your tools:
- Soft, lint-free cloth: Microfiber cloths are ideal.
- Compressed air can (optional): Use only if necessary, with short bursts at an angle.
- Isopropyl alcohol (optional): Use a 70% solution only as a last resort and on the cloth, not directly on the contacts.
Inspection:
- Eject the SIM tray: Use the dedicated SIM ejector tool that comes with your phone or a similar thin pin. Be careful not to push too hard and damage the ejector hole.
- Visually inspect the SIM card and tray: Look for any dirt, dust, debris, corrosion, or damage to the metal contacts on both the SIM and the tray.
- Check for water damage: Water damage can corrode the contacts and render the SIM unusable. Look for any water stains or visible moisture.
Cleaning:
- Wipe the SIM card gently: Use the soft cloth to carefully wipe the gold contacts on the SIM. Avoid touching the contacts directly with your fingers.
- Clean the SIM tray: If there’s light dust or debris, use the compressed air can to blow it out in short bursts. Do not insert the nozzle directly into the tray, and hold the can at an angle to avoid moisture entering.
- For stubborn dirt or corrosion: If the above methods don’t work, dip a corner of the cloth in a small amount of 70% isopropyl alcohol and gently wipe the contacts on both the SIM and tray. Let everything dry completely before reinserting.
Checking for Physical Damage
Both your iPhone and SIM card can suffer physical damage that might trigger the “No SIM” message. Here’s how to inspect them carefully:
Inspecting your iPhone:
- Look for cracks or dents: Carefully examine the exterior of your iPhone, especially around the SIM tray and antenna lines (usually near the top and bottom). Any visible cracks or dents could indicate internal damage affecting the SIM reader.
- Check the charging port: Examine the charging port for any debris or foreign objects stuck inside. These can sometimes interfere with the SIM tray connection.
- Ensure no liquid damage: Look for any signs of water damage, such as corrosion around the charging port, speaker grills, or SIM tray. Even minor liquid exposure can affect internal components.
Inspecting your SIM card:
- Examine the gold contacts: Carefully inspect the gold contacts on the SIM card for any scratches, cracks, or discoloration. Damaged contacts can prevent proper connection with the reader.
- Check for bends or warping: Ensure the SIM card is flat and not bent or warped, as this can disrupt its ability to connect properly.
- Look for water damage: If you suspect water exposure, look for any water stains or corrosion on the SIM card. Water damage can render the SIM unusable.
Try ReiBoot to Fix iPhone 14 Says No Sim
Saving the best for last, you can fix this problem using Tenorshare ReiBoot software. it can also troubleshoot the “no sim” issue that you are facing on your iPhone 14. The best thing about using Tenorshare ReiBoot for this task is that the issue will be fixed within a few minutes.
And if you are frustrated by trying different hacks to fix your problem, here is how you can perform a standard repair using Tenorshare ReiBoot.
- First, download the ReiBoot software on your iPhone and install it using the instructions. Plug in your iPhone, and once it gets recognized, click on the “start” button and get into the recovery tool.
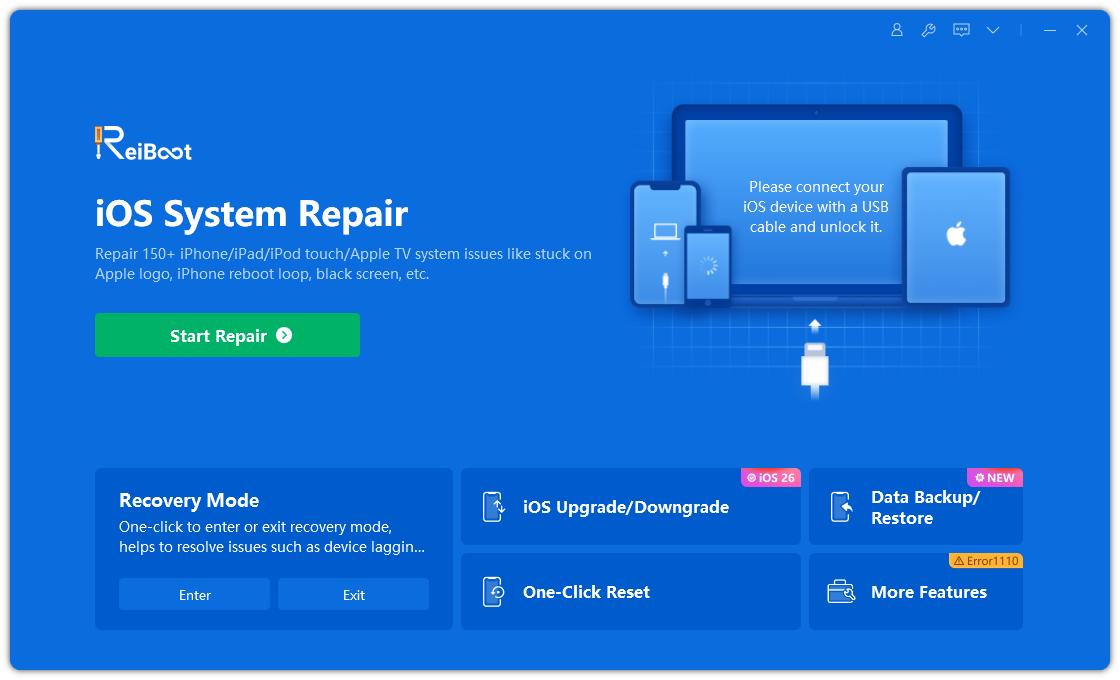
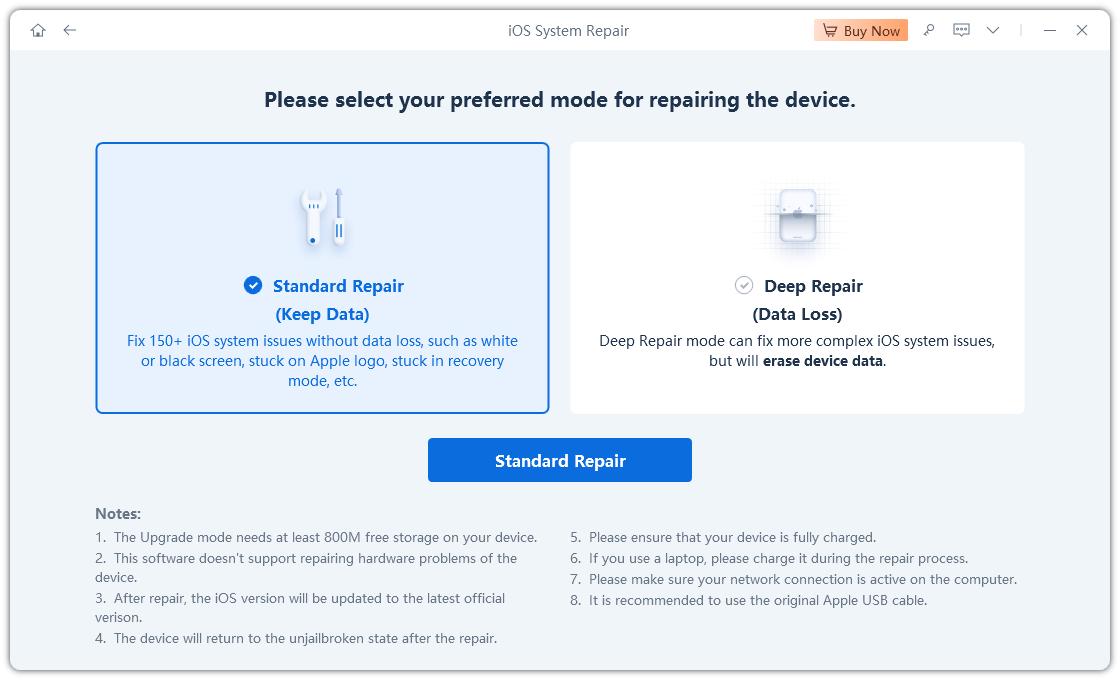
- From the options, press on “standard repair” to start the repair process.
- Now, from the prompt on your screen – press “download firmware package”.
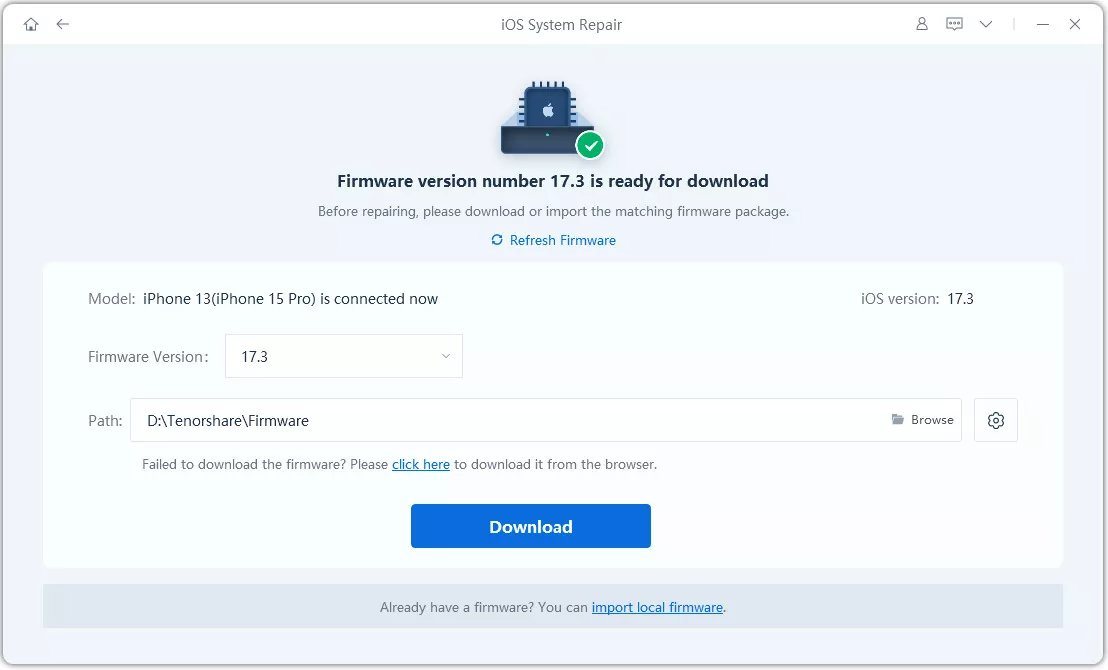
- Once the package is downloaded, click on “Start standard repair”.
The download and repair process can take some time. So, sit tight and do not unplug your device while the process is underway.
Dealing with Persistent Issues
When to Contact Your Carrier
Sometimes, the issue lies with your cellular carrier. Here are some situations where contacting your carrier is the best course of action when encountering the “No SIM” message on your iPhone:
1. Account issues:
Outstanding payments: Unpaid bills or other account issues can restrict cellular service. Contact your carrier to verify your account status and resolve any outstanding payments.
Plan limitations: Ensure your current plan includes cellular data and hasn’t exceeded its data allowance, which could result in service suspension.
SIM activation or deactivation: If you recently switched carriers, activated a new SIM, or had your SIM deactivated, your carrier can help complete the necessary steps for activation or reactivation.
2. Network outages or technical issues:
Widespread outages: In case of reported network outages in your area, contacting your carrier can confirm the issue and provide an estimated repair timeline.
SIM provisioning errors: Sometimes, errors occur during SIM provisioning by the carrier, preventing your phone from recognizing the SIM. Your carrier can troubleshoot and fix these issues.
Device-specific issues: If the “No SIM” message appears only on your iPhone while other devices on the same network work fine, contacting your carrier can help investigate if it’s a device-specific issue related to their network.
3. Hardware problems:
Damaged SIM card: While you can inspect for visual damage yourself, your carrier can definitively diagnose if the SIM card is physically damaged and requires replacement.
Faulty SIM reader on your iPhone: Though less common, hardware issues within your iPhone’s SIM reader can prevent SIM recognition. Your carrier can help escalate the issue to Apple for further diagnosis and repair.
Visiting an Apple Store or Authorized Service Provider
If all else fails, seeking professional help is the next step. Visiting an Apple Store or an authorized service provider can be your final step after trying all the troubleshooting options for your “No SIM” issue. Here’s what to expect when you take this route:
Apple Store (Genius Bar):
- Appointment: While walk-ins are sometimes possible, it’s highly recommended to make an appointment with a Genius Bar technician using the Apple website or app. This ensures shorter wait times and guarantees your time with a technician.
- Diagnostics: The technician will run diagnostics to pinpoint the root cause of the issue. This may involve examining your iPhone physically, checking software logs, and testing the SIM card functionality.
- Repair options: Based on the diagnosis, the technician will propose solutions. These could include:
- Software updates: If outdated software is causing the problem, they will update your iPhone to the latest version.
- SIM card replacement: If the SIM card is damaged, they can replace it with a new one.
- Hardware repair: If the issue lies with the iPhone’s SIM reader or other hardware components, they will explain the repair process and estimated cost.
- No solution: If the issue cannot be resolved and is not covered by warranty, they will offer alternative solutions or refer you to your carrier.
Authorized Service Provider:
- Similar process: The overall process at an authorized service provider is similar to the Apple Store, with a trained technician diagnosing the issue and proposing solutions.
- Warranty coverage: Authorized service providers may or may not have the same warranty coverage as Apple Stores, so check beforehand to avoid unexpected costs.
- Convenience: These providers might be located closer to you, offering more convenient access.
Prevention Tips
Proper SIM Card Handling
Preventing “No SIM” errors begins with how you handle your SIM card. Here are some best practices for handling your SIM card to prevent “No SIM” errors and ensure smooth cellular connectivity:
Handling:
- Minimize handling: The more you handle your SIM card, the higher the risk of accidental damage or dust accumulation. Only remove it when necessary, like switching phones or activating service.
- Use SIM ejector tool: Always use the dedicated SIM ejector tool that came with your phone to eject and insert the SIM card. Avoid using sharp objects like pins or needles, as they can damage the contacts.
- Hold by the edges: Avoid touching the gold contacts on the SIM card directly. Hold it by the edges to prevent fingerprints, dust, or oils from transferring.
- Store safely: When not in use, keep your SIM card in its original holder or a safe, dust-free location.
Cleaning (if necessary):
- Clean rarely: Regular cleaning isn’t recommended, as frequent handling increases damage risk. Only clean if dust or visible debris is blocking the contacts.
- Use soft cloth: Gently wipe the gold contacts with a soft, lint-free cloth like a microfiber cloth.
- Compressed air (optional): If dust persists, use compressed air in short bursts at an angle to blow it away. Never directly insert the nozzle into the card.
- Avoid liquids: Do not use any liquids, even isopropyl alcohol, directly on the SIM card. They can damage the sensitive components.
The Role of Carrier Settings Updates
How to Check and Update Carrier Settings
Keeping your carrier settings up-to-date is crucial for optimal device performance. Carrier settings on your iPhone contain data about your phone and your network settings. You can hop onto it to update the settings when there is an update due. Here is how you can do it.
- Before starting, ensure that your iPhone has access to Wi-Fi (Since your phone cannot access cellular data).
- Click on the settings icon and then hop onto General and then click on About.
- From General, look for “carrier”.
- Now, if there are any updates due, you will see an option for it.
Conclusion
The “iPhone says no SIM” error can be frustrating, but with the right approach, it’s often resolvable. This guide has walked you through various troubleshooting steps, from simple fixes to more complex solutions, and provided tips for preventing future issues. Remember, if the problem persists, seeking professional assistance from Apple or your carrier is a wise choice. With patience and persistence, you can overcome this challenge and ensure your iPhone stays connected and functional.


